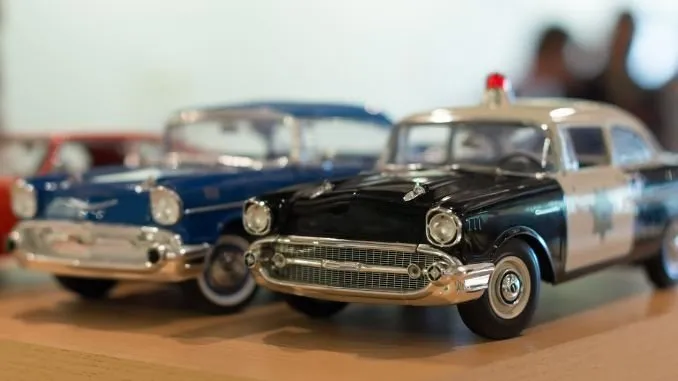
What are Diecast Model Cars?
Diecast model cars are miniature replicas of real-life vehicles, typically made using a die-casting process, where molten metal is poured into molds. These models are popular among collectors and hobbyists of all ages, offering a tangible way to appreciate automotive design and history. The level of detail in diecast cars can vary greatly, from simple toy-like models to highly detailed, accurate representations of specific vehicles. Making these model cars is a rewarding hobby that combines craftsmanship and a passion for automobiles. The allure of collecting and crafting these miniature vehicles lies in their ability to capture the essence of full-sized cars in a compact and accessible form. Whether you’re a seasoned collector or a curious beginner, the world of diecast model cars offers a fascinating and engaging experience.
Materials Needed to Make Diecast Model Cars
To begin your journey into making diecast model cars, you’ll need to gather essential materials. Firstly, a diecast car kit serves as the foundation, providing the body, chassis, and often the wheels. These kits come in various scales, with 1:18 and 1:24 being popular choices. High-quality paints, including primers, base coats, and clear coats, are essential for achieving a realistic finish. Consider using acrylic paints for ease of use and cleanup, or enamel paints for durability. Decals and detail parts, such as emblems, badges, and interior components, will add authenticity. Additionally, you’ll need various adhesives, including super glue for small parts, and epoxy for more robust bonds. Finally, a selection of sandpaper in different grits is necessary for smoothing surfaces and preparing them for paint. Having these materials readily available will streamline the process and enhance your model car making experience.
Essential Tools for Diecast Car Making

Along with materials, having the right tools is crucial for successfully making diecast model cars. A hobby knife with a sharp blade is essential for removing parts from sprues and trimming excess plastic. A set of small files and sanding sticks will help refine surfaces and remove imperfections. Tweezers are invaluable for handling small parts like decals and interior details. A set of paint brushes in various sizes is necessary for applying paint, ensuring you have brushes for base coats, details, and clear coats. A cutting mat protects your work surface and provides a stable base for cutting and assembly. A magnifying lamp can be incredibly helpful for seeing small details, reducing eye strain, and improving accuracy. Finally, an airbrush and compressor can take your painting to the next level, providing a smooth and professional finish. Investing in these tools will greatly improve the quality and enjoyment of your model car making projects.
Step-by-Step Guide to Making Diecast Model Cars
Embarking on the creation of diecast model cars is a rewarding process that requires patience and attention to detail. This step-by-step guide will help you navigate the process, ensuring a satisfying outcome. Before starting, gather all necessary materials and tools, and clear a well-lit workspace. Each step is important, so taking your time will provide the best results. From preparing the body to adding the finishing touches, this guide offers a clear roadmap. This comprehensive guide will provide you with all the information needed to craft a remarkable miniature vehicle. Remember, the key to success lies in meticulous preparation, steady hands, and a passion for the craft. Let’s get started and bring these miniature marvels to life.
Preparing the Diecast Car Body
The preparation of the diecast car body is a fundamental step in the model-making process. Begin by carefully removing the body from the sprue or kit, using a hobby knife to trim away any excess plastic. Then, thoroughly inspect the body for imperfections, such as mold lines or flash, and carefully remove these using a file or fine-grit sandpaper. Next, wash the body with warm, soapy water to remove any dust, oils, or release agents that could affect paint adhesion. Allow the body to dry completely before proceeding. Applying a primer coat is essential, as it provides a uniform surface for the paint and helps it adhere to the metal. Apply thin, even coats of primer, allowing each coat to dry completely before applying the next. Once the primer is dry, lightly sand the surface with fine-grit sandpaper to smooth out any imperfections. Proper preparation of the car body is the foundation for a professional-looking finish, so take your time and ensure each step is done with precision.
Painting the Diecast Car

Painting the diecast car is where your model truly begins to come to life. Start by choosing high-quality paints that are compatible with your primer. Acrylic paints are popular for their ease of use and quick drying times, while enamel paints offer durability. If using an airbrush, thin the paint to the appropriate consistency and practice on a test surface to ensure a smooth, even finish. Apply the base coat in thin, even layers, allowing each coat to dry completely before applying the next to prevent runs or drips. Multiple thin coats are preferable to a single thick coat. Once the base coat is dry, you can add details such as pin stripes, logos, or two-tone color schemes. Consider using masking tape to create precise lines. After the details are complete, apply a clear coat to protect the paint and give the model a glossy finish. Multiple thin coats of clear coat will provide the best results. Let the clear coat cure completely before handling the model. Proper painting techniques and patience are crucial for achieving a professional and eye-catching finish, transforming your diecast car into a work of art.
Applying Decals and Details
Adding decals and fine details is essential for adding realism and personality to your diecast model car. Carefully cut the decals from the sheet, trimming away any excess clear film. Dip the decal in warm water for a few seconds to loosen it from the backing paper. Using tweezers, gently slide the decal off the backing paper and onto the car body. Position the decal carefully, using a soft cloth or cotton swab to remove any air bubbles. Once the decal is in place, use a decal setting solution to help it conform to the contours of the car and prevent silvering. After the decals are dry, you can add other details, such as trim, emblems, and lights, using fine brushes and detail paints. Be patient and precise, as these details can significantly enhance the model’s appearance. Applying decals and adding these intricate details is a test of skill, but it’s where your model truly becomes unique. Taking your time during this phase is critical to obtaining a professional finish.
Assembling the Diecast Car
Assembling your diecast car is the culmination of all your efforts, bringing the individual components together into a complete model. Carefully remove the parts from the sprues, paying attention to the instructions. Start by assembling the chassis, attaching the wheels, suspension, and engine components. Use the appropriate adhesives for each part, such as super glue for small parts and epoxy for stronger bonds. Then, attach the interior components to the body, including the dashboard, seats, and steering wheel. Ensure the components fit correctly and are properly aligned. Next, carefully attach the body to the chassis, making sure the alignment is perfect. Finally, add any remaining details, such as mirrors, wipers, and lights. Take your time during assembly, ensuring each part is securely attached. The correct assembly of your diecast car is crucial to its overall look and durability. A well-assembled model will be a source of pride and satisfaction for years to come.
Adding Finishing Touches

Once the main assembly is complete, it’s time to add the finishing touches that will elevate your diecast model car. This is the phase where you can truly showcase your craftsmanship. Detail painting is crucial for adding realism. This includes painting the window trim, door handles, and other small details with precision. Consider using weathering techniques to simulate wear and tear, such as dry brushing to highlight panel lines or washes to add depth. Add small details like license plates, manufacturer badges, and other miniature components. If you want a truly custom touch, you may add aftermarket modifications, such as upgraded wheels or custom interiors. When adding the finishing touches, focus on the small details that truly set the model apart. This is your chance to make your model unique. These extra details demonstrate the maker’s dedication and turn a great model into an exceptional one.
Displaying and Caring for Your Diecast Model Cars
Once your diecast model car is complete, proper display and care are essential to preserving its beauty and value. Display your models in a clean, dust-free environment, away from direct sunlight and extreme temperatures, which can damage the paint and plastic components. Consider using display cases or shelves to showcase your collection and protect the models from dust and accidental damage. To clean your models, use a soft, dry brush or a slightly damp cloth to remove any dust or debris. Avoid using harsh chemicals or abrasive cleaners. Handle your models with care, and avoid touching the painted surfaces to prevent fingerprints and damage. If you need to transport your models, pack them carefully in their original boxes or use protective packaging. By following these simple tips, you can enjoy your diecast model car collection for many years to come. Displaying and caring for your models will ensure that your creations remain in pristine condition.